
Dental Daylight Lighting & Color Rendering in Dentistry: A Practical, Evidence‑Informed Guide for European Clinicians
What “dental daylight lighting” Means in Color Science
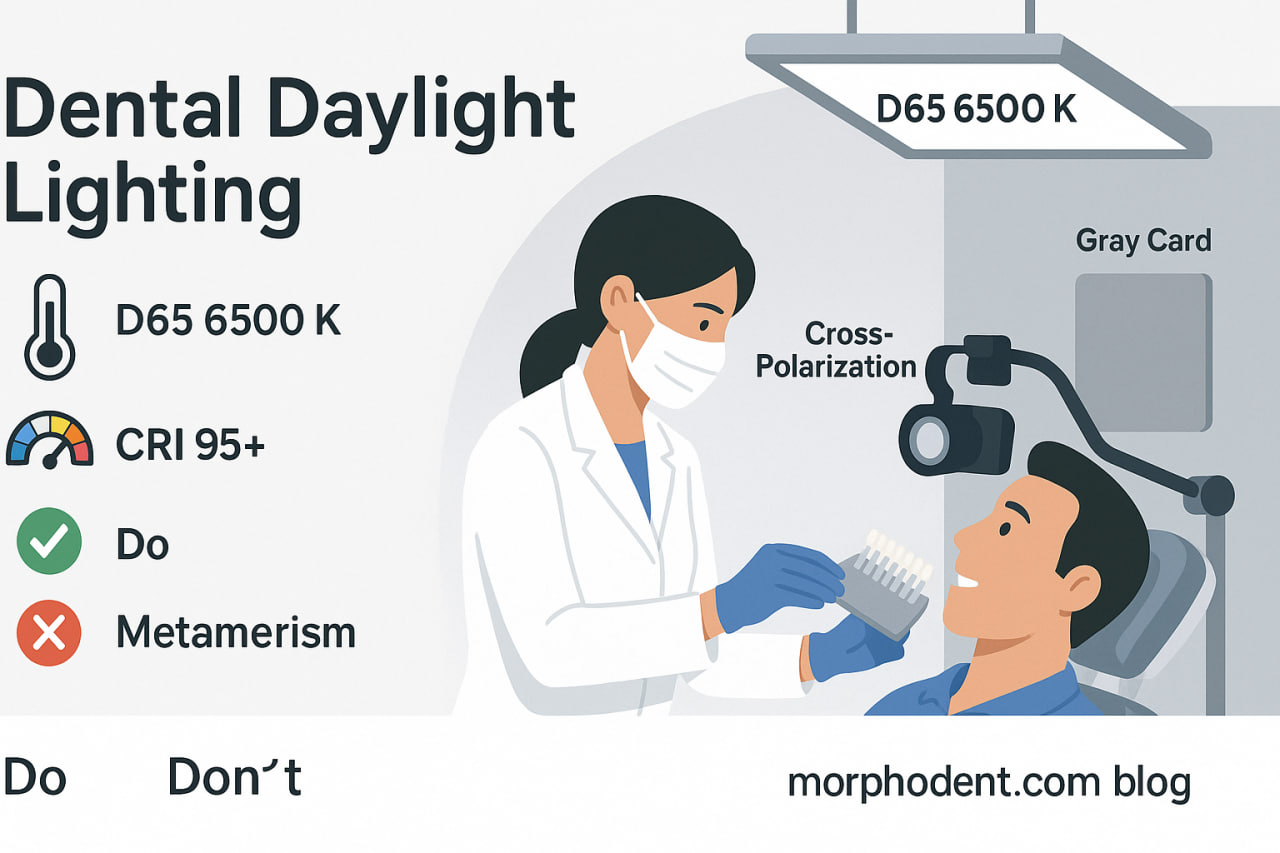
In colorimetry, daylight refers to a standardized model of natural light used as a reference. The most common reference is D65, which approximates midday light in a clear sky and corresponds to a correlated color temperature (CCT) of roughly 6500 K. In practice, clinicians and labs can aim for 5500–6500 K to stay within the “daylight” band that supports accurate color rendition of dental tissues and restorative materials.
Why the Kelvin number matters
Kelvin (K) describes a light source’s apparent color:
- Warm light (~3000 K): cozy, yellowish—pleasant for homes, but tends to shift dental shades warmer.
- Neutral light (≈3500–4500 K): common in offices; better than warm, but can still introduce subtle warm bias.
- Daylight (≈5500–6500 K): closest to standardized daylight references and best for true‑to‑life shade matching and lab QA
CRI: How Faithfully a Lamp Renders Color
The Color Rendering Index (CRI) rates how accurately a light source reveals object colors versus a reference. The scale runs 0–100; higher means more accurate. For dental applications—particularly shade selection, ceramic characterization, and photography—target CRI ≥ 95.
Low‑CRI lighting (e.g., ~70) can make shades look muted, yellowish, or off‑hue, increasing the risk of mismatches in indirect restorations.
Bottom line: In clinics and labs, pair CCT 5500–6500 K with CRI ≥ 95. This combination consistently supports accurate color perception and reproducible photography.
Why Lighting Quality Dictates Clinical Outcomes
Enamel and dentin are optically complex (translucency, fluorescence, opalescence). Composite resins and ceramics add layer‑dependent effects, so visual judgments are fragile. Inconsistent lighting leads to:
- Hue/value/chroma errors in shade selection
- Metamerism (a “match” under one light but a mismatch under another)
- Unreliable lab communication and increased remakes
Aligning clinic and lab lighting around D65‑like conditions reduces these risks and streamlines the try‑in → adjust → glaze cycle.
Practical Recommendations for European Dental Settings
1) Operatory & Lab Lighting
- Primary light: High‑quality LED fixtures at 5500–6500 K, CRI ≥ 95.
- Uniformity: Avoid mixed CCTs in the same zone (e.g., 3000 K ceiling + 6500 K task lamp). Consistency beats variety.
- Surroundings: Use neutral, matte finishes around the field of view (e.g., gray walls/cabinets, non‑glossy surfaces). Reduce color “contamination” from clothing—use neutral clinic gowns for shade appointments.
- Glare control: Diffuse light and avoid harsh, specular reflections on enamel and ceramics.
- Maintenance: Replace aging lamps together; lumen depreciation and spectral drift creep in.
2) Shade Selection Protocol (Chairside)
- Schedule early in the appointment before desiccation; limit dry time (work within ~5–7 minutes) and re‑hydrate if needed.
- Seat the patient upright, lips relaxed. Remove strong makeup/lipstick.
- Set lighting: Daylight CCT 5500–6500 K, CRI ≥ 95; avoid mixed sources (window sun + warm ceiling + phone torch).
- Start with value (lightness), then refine hue and chroma.
- Use clean, standardized shade guides (replace aged or UV‑damaged tabs).
- Check for metamerism by briefly viewing under a second standardized source (e.g., calibrated daylight viewing lamp).
- Document (see photography section) and communicate stump shade for abutments/endo‑treated teeth.
- Where relevant, record translucency & opalescence cues (mamelons, halo, crack lines, white spots) for the lab.
3) Laboratory Quality Control
- Calibrate the ceramic bench and inspection area to D65‑like conditions.
- Verify CRI and CCT on delivery and periodically (manufacturer specs can drift).
- Evaluate ceramics next to neutral gray backgrounds; confirm against the prescribed reference light.
Clinical Photography That Actually Helps the Lab
- White balance discipline: Use a gray card to set custom white balance under your operatory light (same setup as shade selection).
- Consistent modifiers: Soft, diffused light; avoid on‑axis specular hotspots that blow out enamel.
- Cross‑polarization can reduce surface glare and reveal subsurface chroma—use when mapping chromatic gradients, but also take an unpolarized set for texture.
- File labeling: Include patient ID, tooth number(s), shade guide code, stump shade, and lighting spec (e.g., 6000 K, CRI 97) in the note to the lab.
- Monitor hygiene: Calibrated monitors in the clinic and lab close the loop. Without display consistency, even perfect photos mislead.
Dehydration & Time: The Silent Shade Killers
Teeth lighten within minutes when dehydrated, especially thin enamel. Keep the field moist, work efficiently, and if in doubt, re‑check after rehydration or at a subsequent short visit dedicated to shade confirmation.
Metamerism: Catch It Before the Cement Sets
Two materials can match under one light and diverge under another. Strategies:
- Align clinic and lab on D65‑like lighting.
- Do a quick metamerism check under a second standardized light.
- For high‑stakes cases (anterior ceramics), patient bring‑back for shade confirmation under clinic lighting before final glazing.
Dental Daylight Lighting Recommended Specs (Quick Checklist)
- CCT: 5500–6500 K (daylight/D65)
- CRI: ≥ 95
- Consistency: Same CCT/CRI across the shade area, photography area, and lab QC bench
- Environment: Neutral, matte surroundings; control glare and reflections
- Workflow: Standardized shade protocol, disciplined photography, explicit lab notes
Frequently Asked Questions about dental daylight lighting
Is 5000 K acceptable?
It’s closer to neutral‑cool and can work, but 5500–6500 K aligns better with standard daylight references and reduces warm bias.
Do I need special “dental” lamps?
Not necessarily. What matters is verified CCT and high CRI. Many professional LED fixtures meet these specs; verify with the manufacturer.
CRI or TM‑30—what should I look at?
CRI is the legacy metric and still widely used. CRI ≥ 95 is a reliable minimum. If TM‑30 data are available, look for high fidelity (Rf) and neutral gamut (Rg ≈ 100).
Can I mix natural window light with LEDs?
Avoid mixing dissimilar sources during shade selection and photography. If you rely on daylight from windows, use it consistently and avoid strong shifts during the session.
References & Further Reading (Clinical Corner)
- Zarb GA, Hobkirk JA, Eckert SE, Jacob RF. Prosthodontic Treatment for Edentulous Patients (various editions). Shade communication principles and lab coordination.
- McCracken’s Removable Partial Prosthodontics. Shade selection, characterization, and lab protocols in removable prosthodontics.
- Shillingburg HT, Hobo S, Whitsett LD, et al. Fundamentals of Fixed Prosthodontics. Clinical shade matching, prep influences on final color.
- Rosenstiel SF, Land MF, Fujimoto J. Contemporary Fixed Prosthodontics. Optical properties of enamel/dentin and ceramics; shade mapping workflows.
- Dietschi D (ed.). Adhesive Metal‑Free Restorations. Composite/ceramic layering and optical effects.


